Intro to Events
What is an Event?
Events are the basic building blocks of reports. An event is any action associated with a user. Examples of events you can define in Heap include “Create Account,” “Login,” “Received Transactional Email,” or “Follow A Friend”.
In most other analytics tools, you need to write custom code to track events. However, Heap tracks everything automatically, which means defining events is a lot easier. It also means that every event definition is completely retroactive since Heap has been recording everything from day one.
The best thing about events in Heap is that no matter how you define your event, all of the correct data will be there. This means if you modify an event definition, define an event incorrectly, or want to add to your event, all the data is still readily accessible.
How Many Events Should I Define?
To get started analyzing your data, you only need to define a handful of events that will help you answer specific questions. There is no need to define your entire tracking plan upfront! When new questions come up, you can always define new events. All the data will still be there, even as you add definition further down the road.
Common first reports include:
- Graph: Checkouts per day
- Users View: Active customers (create a segment based on session activity)
- Funnel: Conversion Flow (Sign up, checkout, etc.)
- Retention: Use a key engagement metric (place order, add friend, comment, etc.)
Personal and Shared Events
In Heap, you can define personal and shared events. Personal events are ones that only appear in your Heap dashboard, and by default, are always added to your ‘Personal’ category. You can publish personal events to your shared space at any time.
Shared events can be accessed by your entire team. To stay organized, we recommend naming and organizing all shared events in a way that is helpful for your team, as detailed below
Event Naming Conventions
Before you get into defining events, it’s essential that you plan a consistent naming convention for your events and categories to help your team understand them.
You can use our Naming Conventions feature to establish and enforce a consistent naming convention for new events. This convention works as a template with pre-selected drop-down items for setting up the event name.

You can also establish a naming convention without using this feature by informing your team members of how events should be named.
Some best practices for naming and organizing events include:
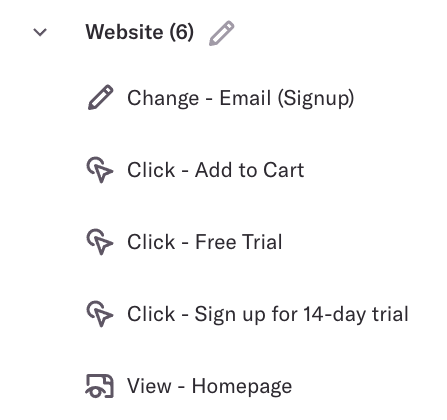
Organize your events into categories, which are essentially folders for events. A category can be a product, feature, or page. We recommend using categories to organize actions your users take in different areas of your product.
Use a standard naming pattern for defining events, such as the Location – Action – Object pattern in the GIF above.
Choose a standard tense (either past or present) for your event names. For example, if you use the present tense, you’ll want to name your event ‘Start Checkout’ instead of ‘Started Checkout’ (past tense).
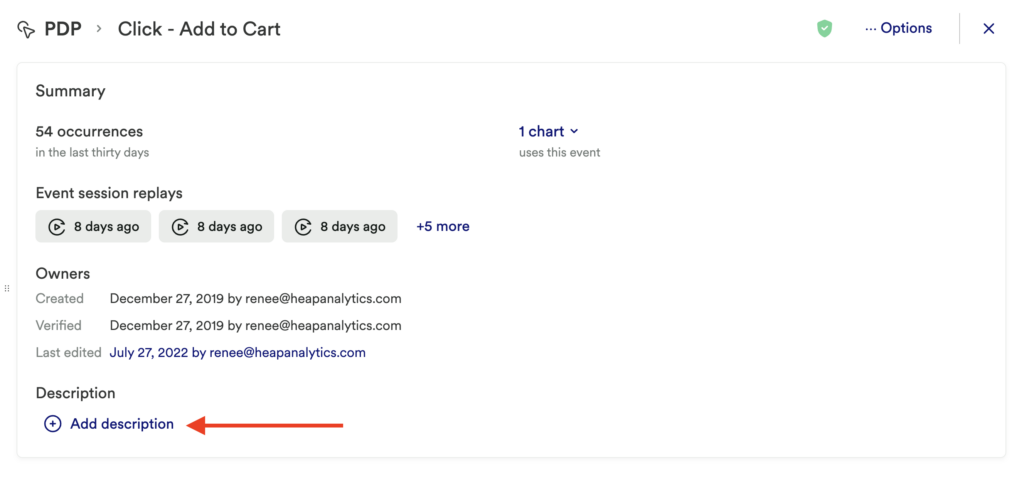
Add a note to the event to provide context about why it was created and what it’s for. This is also helpful for describing differences between similar events, adding context for when an event is updated, noting if there is an exception that is not accounted for in this event, and more.
To add a note, navigate to Define > Events, click on the event to open up the event details, then click ‘Add Note’. You can add multiple notes to the same event, and edit existing notes.
In addition to planning your event naming convention, we recommend that you also plan a consistent (and similar) naming convention for your reports to provide a better context around the content of the report. The categorization of these reports highly depends on your organizational workflow, though we recommend including a product component or team name as a preface. Examples of reports with this naming convention:
- Marketing – Demo Request Conversion
- Dashboard – Weekly Active Users
Please don’t hesitate to reach out to support@heap.io if you have questions on how to best apply these conventions to your organization.
Defining Events in the Event Visualizer (recommended)
The Event Visualizer is Heap’s simple point-and-click interface for defining events. Instead of manually logging events within code, you can define events by simply clicking around your website or app. No coding knowledge is required, though it is useful for refining your event definitions further.
To get started, jump to our Event Visualizer article and select your platform at the top.
Defining Events in the Events Tab
Web
We provide the Visualizer as an easy way to define events without using code. However, if you are familiar with your site’s markup, you can create events from the Events page within Heap.
There are 5 types of events we capture in Heap out-of-the-box:
View page
: A pageview (MDN reference)Click on
: A click on an element (MDN reference)Change on
: A change in aninput
,textarea
, orselect
element (MDN Reference)Submit on
: A form submission (MDN Reference)Start Session
: A session
In the following examples, we’ll be referencing this simple form:
Tags, Classes, and Ids
Tag refers to the tag name (e.g. <input>
). In line with standard CSS practices, in Heap, this is written as input
.
A class name comes after the attribute class=
. Classes are prepended by a period, for example .email
.
An id comes after the attribute id=
. IDs are prepended by a hash, as in #user_password
.
An attribute is the part of the markup that is not an id
or class
, such as placeholder
or name
. Attributes are contained in square brackets, as in [name=email
] or [placeholder="Email Address"]
. Quotes are only required if the attribute contains a space.
In this example, you would define:
<form accept-charset="UTF-8" action="/login" class="login signupform" id="new_user" method="post">
<label>Email</label>
<input autofocus="autofocus" class="email" id="user_email" name="email" placeholder="Email Address" tabindex="1" type="email">
<label>Password</label>
<input class="field with-reset" id="user_password" name="user[password]" placeholder="Password" tabindex="2" type="password" />
<input class="button b-big" name="commit" tabindex="3" type="submit" value="Sign In" />
</form>
- A pageview as
View page: /signup
. - A click into the email field as
Click on: .email
orClick on: [placeholder="Email Address"]
which uses the attribute instead of the class. - A change in the password field as
Change on: #user_password
. - A form submission as
Submit on: #new_user
.
You can combine tags, classes, and IDs in the same element by stringing them together. For example, Change on: input#user_email.email
.
To combine selectors in a hierarchy, add a space between the tags, classes, and IDs. For example, let’s say you have more than one email form on a page: one to sign up, another to subscribe to a newsletter, and both email fields are defined the same way. You can use the form
ID to specify which form to target; Change on: form#new_user #user_email
which will limit the event to just the new user sign up form; and Change on: form#newsletter #user_email
, which would limit the event to the newsletter form.
Wildcards
The wildcard *
character is fully supported in all types of events in Heap.
Attributes
To use attributes in an event definition (here defined as attributes other than classes or IDs, and which includes things like name
, type
, and anything that starts with data-*
), simply surround the attributes’ key and value elements with brackets. For example, name="email"
from the sample markdown above becomes[name=email]
within Heap’s event creator.
You can also use simplified attribute selectors to match data attributes:
[key]
Targets elements with a key attribute[key=value]
Target elements with a key attribute that’s value.[key*=value]
Targets elements with a key attribute containing a value within it.[key^=value]
Targets elements with a key attribute starting with value.[key$=value]
Targets elements with a key attribute ending with value.
Please note, we do not capture the following attributes:
data-ember-action
data-react-checksum
data-reactid
input[value]
maxlength
onclick
onsubmit
style
value
iOS, Android, React Native
We provide the option to create and adjust mobile and React Native event definitions from the events page. However, we strongly recommend defining new mobile and React Native events via the Event Visualizer or the Live View. These allow you to verify the accuracy of the definition by testing it via a device or emulator.
When defining iOS, Android, and React Native events, you’ll use autocaptured events and properties as a base, then apply filters to define your new event.
For example, we have a base ‘touch on’ event:

Which you can use to define a touch element and apply a filter to specify the criteria for this event definition:

Base Events & Properties for Defining Mobile Events
Out-of-the-box, Heap provides the following mobile events which you can use as a base, listed on the left. Each is defined based on the base property in the middle column. Key properties that are often used to define a new event based on this one are listed on the right.
Android
Event | Base property | Key properties |
---|---|---|
View Screen | Full Activity | n/a |
Fragment Transitions | Added Fragments | Activity, Full Activity, Visible Fragments |
Page Transition | Transitioned-to Page Title | Transitioned-to Page Class, Transitioned-from Page Title and Class, View Pager Swiped, Target Resource ID |
Touch On | Hierarchy | Target Text, Target Class, Full Target Resource ID |
Edit Field | Hierarchy | Target Text, Target Class, Full Target Resource ID |
App install/Upgrade | Current Version Name | Is Upgrade |
iOS
Event | Base property | Key properties |
---|---|---|
View Screen | View Controller | Title, Accessibility Identifier, Accessibility Label |
Touch On | Hierarchy | Target Text, Target View Class, Target View Name, Accessibility Identifier, Accessibility Label |
Action Methods | Action Method | Target Text, Target View Class, Target View Name |
Edit Field | Hierarchy | Target View Class, Accessibility Identifier, Accessibility Label |
Gesture Recognizers (any event related to gestures, such as panning, zooming, etc.) | Target View Ivar | n/a |
App Install/Upgrade | Current Version Name | Is Upgrade |
React Native
Event | Base property | Key properties |
---|---|---|
View Screen | Screen path | Navigation Action, Screen Name |
Touch On | React hierarchy selector | Target Text, Is Long Press |
Change On | React hierarchy selector | n/a |
Edit Field | React hierarchy selector | Placeholder Text |
Page Transition | React hierarchy selector | Page Index |
Generally, it’s important to ensure that the event is defined by a set of properties that specifically refer to that particular interaction. When defining mobile events, consider the following:
- Can this event be specifically defined based on the default property it relies on?
- Do the property values have semantic meaning (e.g. “RegistrationFormScreen”) or are they generic (e.g. “FormScreen”)?
- Are certain key property values being reused throughout the app?
Limitations
Currently, Heap cannot be used to capture the following types of events.
- Push notifications: As a workaround, you can send custom server-side events as push events. However, since these will not be sessionized, and interactions with these push events will be part of a client-side session, using this workaround will inflate your session count and you will not be able to conduct session-based analysis.
- App crashes: Heap is not intended to be used as a replacement for Crash analytics solutions. A workaround is to catch otherwise-uncaught exceptions to send as a custom event to Heap.
- Uninstall events
Additionally, we do not provide a way to tell if an event was captured while the app was offline.
Best Practices
We recommend reviewing the Best Practices sections of the iOS and Android Event Visualizer guides, as most of these also apply to defining mobile events via the events page.
React & Angular Apps
Using a Single Page App framework like React or Angular? Be sure to write distinct classes or IDs or make use of data-attributes so you can accurately define events based on those selectors.
Managing Events
Reviewing & Updating Event Details
Once you’ve defined an event, you can review it by navigating to Define > Events, searching for the event, and clicking on it in the list that appears.

On the Event details page, you can see the following:
- Number of occurrences over the past week
- Number of reports that include this event
- The event history (how it was created, and when it was created, verified, and last edited)
- A ‘More Analysis’ drop-down, which opens up a set of analysis options
- Any notes added to the event

Further down, you’ll see an analysis preview section (more info on this Check Analysis Preview), and a section listing all of the Heap Connect destinations this event is currently synced to.
You can edit the event definition in the ‘Event Criteria’ section further down the page, and review the full event history at the bottom.
Organizing Events
To categorize events into categories, simply click the ‘Uncategorized’ text when creating or editing the event, then enter the category name. You can also create new categories in this area.

To categorize several events at once, select the checkmark next to them where they are listed on the Events page, then click Move at the top.

A pop-up will appear where you can select an existing category or create a new one by simply typing the new category name.

Combo Events
If you have two separate events you’d like to be able to view as one event, such as a ‘Free Trial’ event and a ‘Sign Up’ event that you’d like to view together as ‘Trial Signup’, you can combine them into a combo event.
You can also use combo events to seamlessly understand usage across web and mobile apps: just combine your web and mobile login, purchase, or sign up events into one omnichannel event, and you’ll be ready to analyze!
For a complete breakdown of activity, group by source in analysis.
To create a combo event, navigate to Define > Events and click the + New Event button. From the Sources drop-down, select Combo.
Next, select the events you’d like to add to this combo event by clicking the + Add Event button. For our Trial Signup example, we will add our events for clicking free trial and going through the process of signing up.
Click the Define Event button to save your new combo event. It will be added to the events page, indicated by the combo icon.
To create a combo when editing an existing event, navigate to Define > Events, find and click on the event you’d like to edit to open up the event details page, then in the Edit Event Criteria section, select Combo under the Source drop-down. From there, add the event you’d like to combine and click Update Event.
Capturing Multiple Versions of an Event
If you need to update an existing event definitions to capture two versions of the same event that have different CSS selectors, you can combine them by separating the multiple target elements within the existing event definition with a comma. This means that a.b, c#d targets elements that match a.b or c#d. For example, if you’re trying to select both the user email and user name in one event, you can create an event to capture the change on either input field by using #user_email,#user_name
.
Note: Snapshots do not currently work with combo events.
Feel free to reach out to support@heap.io for help defining events through the Event Visualizer or through the Events tab in Heap’s UI.
Using Custom Events to Build New Events
Custom events are events that are sent to Heap using our API. Once they come into Heap, we automatically define these events for you so you can start using them in analysis. You can also rename, categorize, use them in combo events, and add notes to these events to keep them organized.
Once brought in by your API, you can rename custom events to specify the conditions of the event. For example, you might rename your custom event to ‘Order Confirmation – Revenue > $50’, ‘Sent Email – Subject: Getting Started’, and ‘Submit Sign Up – > 20 employees’. These names clearly define the parameters of the event for use in analysis.
The ‘Custom’ Source will only be available in the drop-down once you have sent an event via the heap.track API.
To build a new event using a custom event as the base:
- Navigate to Define > Events and click the ‘New Event’ button
- Choose ‘Custom’ as the Source, and select the custom event you’d like to use as a base
- Add filters to specify the parameters of your new event
- Rename and categorize your new event

Custom events are often created using custom properties or Snapshots. When a custom event definition is built on a custom property, you can see the custom property in the event definition. You can also jump to the custom property that the event is built on by clicking the external link icon next to the custom property.

Managing React Native Event Definitions
In SDK versions 0.9.0 and above, React Native events are categorized as React Native events in Heap, and use a hierarchy selector. Previously, in versions of the SDK less than 0.9.0, these were categorized as custom events, and used filters. For a full overview of what changed and how to migrate legacy events, see Migrating legacy React Native events for Heap 0.9.0.
In SDK versions below 0.9.0, screenviews should be defined with the path
property, as seen in the screenshot below.

For SDK versions below 0.9.0, touch event definitions are defined using the Custom Event touchableHandlePress
, which can be found under the Custom source. touchableHierarchy
will typically contain the most relevant information for specifying a particular event.
As an example, when defining a Touch Restaurant Name property, you want to specify that touchableHierarchy contains the text SeeRestaurantButton.

When using multiple filters to define an event, it’s best to separate the conditions out than to use a single string along the lines of “[title=Product Name];|TextInput;” because a change to the component hierarchy or to the set of captured props could cause this event to no longer match properly.
Fact-checking Your Event Definitions
Unsure if you defined your event correctly? There are a couple of things you can check to gain confidence.
Check Analysis Preview
On the Event details page (Define > Events > click the event you’d like to see the details for), you’ll notice an Analysis Preview section. This preview gives you an at-a-glance view of your event grouped by various properties, depending on the type of event.
For this pageview event, which is defined as any page matching /examples/*
, we can see the top 5 matching paths, verifying that our event is correct. Other events have different groupings, like href
, target text
, or custom properties for custom events.
Check the Live View
Heap’s Live view provides you with a streaming, raw feed of all of your Heap events. You can use this page to QA your event definition by checking that when you take an action corresponding to your event definition, that event is captured in Heap.
To learn how to QA event definitions in the Live View, see the QA Events with Live View section of Live View.
Archiving Events
To archive an event, from the Define > Events page, click the event to open up the event details, then click the archive icon in the top-right.

To archive multiple events at once, from the events tab, click the checkboxes next to the events, then click the archive button at the top.

Restoring Archived Events
See the Restoring Archived Definitions section of the Data Cleanup guide for complete steps to restore archived events.
Deleting Archived Events
You can also delete archived events to remove them permanently from your Heap workspace. Note that, once deleted, this event cannot be restored.
To delete an archived event, navigate to Definitions > Archived, search for and click on the event you wish to delete, select the ‘more options’ icon in the top-right, and click Delete.
