Skip to content
  • Home
  • University
  • Developers
  • API
  • Releases
  • Status
  • Home
  • University
  • Developers
  • API
  • Releases
  • Status
Home Define & Analyze Data Management Creating & Managing Snapshots
Getting Started Installation Administration Define & Analyze Analysis Examples Heap Plays Success Guides Integrations Heap Connect Data Privacy

Table of Contents

Was this article helpful?

Yes No

Thank you for your feedback!

Creating & Managing Snapshots

In this article you'll learn:

  • How to create Snapshots via the Event Visualizer and the Events page
  • Use cases for creating Snapshots to capture a variety of data types
  • Information on using snapshotted data within custom properties
  • How to use pageview snapshots to attach custom properties and events to a pageview
This doc is for: Admins Architects
View instructions for: 

Snapshots give you the ability to capture additional metadata that isn’t autocaptured by Heap out-of-the-box. Examples of what you can capture with Snapshots:

  • Search queries entered by users in any search bar on your site
  • The price, item name, or star rating of a product when it is added to a customer’s cart
  • Form selections, such as if a checkbox, radio button, or date field in a form was clicked or not

Normally, you’d have to resort to custom tracking code to bring in these additional properties. With Snapshots, however, you can take a snapshot of this relevant data on a page, and attach them to events without the need to write extra code.

Some important notes about how Snapshots work:

  • Because you are defining new metadata for Heap to capture, Snapshots are not retroactive: they begin collecting data from the point when they were first created. So if you created a Snapshot on 3/16/2020, you will only be able to analyze that Snapshot data going all the way back to that date.
  • Archiving and then restoring archived events with Snapshots results in the loss of data from the duration of time when the event was archived.
  • Snapshots are not supported for mobile installations. However, they are supported on web mobile installations, including WebViews.

Creating Snapshots

Before we begin, let’s go over the different types of Snapshots you can create:

  • Text in element: An element of your page as described in the DOM element selector. Each time someone interacts with this element, the full text inside the nearest matching element gets extracted, trimmed, and attached to the event as a property.
  • Form Value: The value of a form field. If you’re using Snapshots to capture the text added to a form field (like our example), this is what you should select.
  • Value of JavaScript: Specify any Javascript expression. Each time someone interacts with this element, the Javascript expression gets evaluated, and the return value gets attached to the event as a property.

Note that once your Snapshot is saved, it will take 2-10 minutes for that change to show up in your heap.js file. Once heap.js is updated, it should show up in the dashboard immediately after it’s captured.

Create Snapshots in the Event Visualizer

Snapshots can only be added to shared events, not personal events.

You can define new Snapshot properties to be attached to a new event in the Event Visualizer. This flow is meant for a use case where you are creating a new event and a snapshot at the same time. If you’re looking to create a snapshot to add to an existing event, see Add Snapshots via the Events Page.

To create a Snapshot in the Event Visualizer, complete the steps below:

1. Launch the Event Visualizer and select the element on the page you want to configure a Snapshot for. In an example from Heap’s contact page, we may want to collect and analyze responses to the ‘What can we help you with?’ question, so we’ll click on this element.
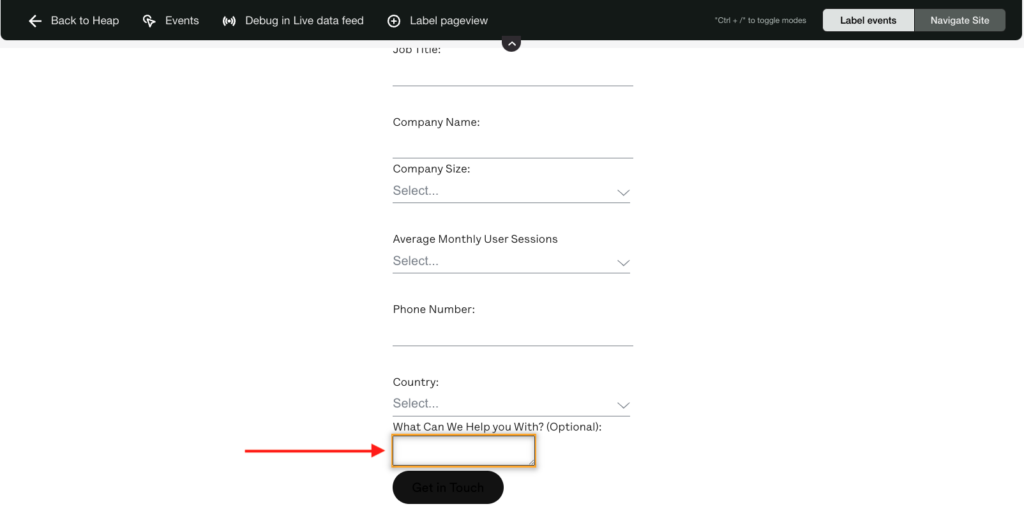
heap.io in the Event Visualizer with an arrow pointed at the 'What Can We Help You With?' (Optional) text field

2. A pop-up will appear for you to define the event. Click the Add Snapshot button at the bottom of that pop-up.
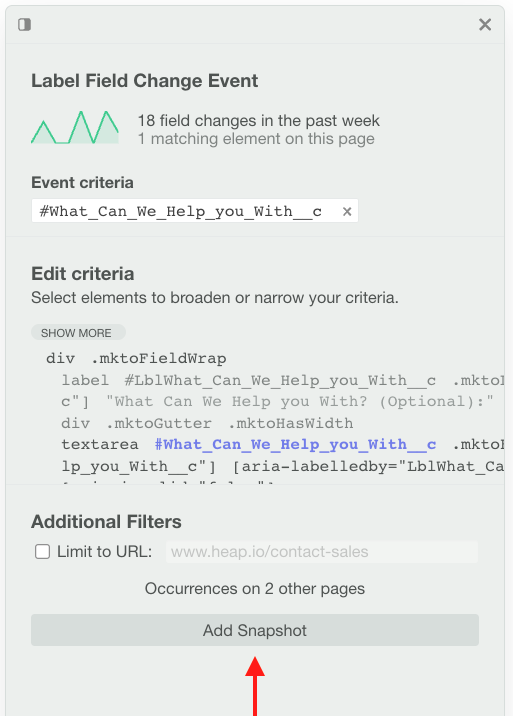
The 'define field change event' pop-up with an arrow pointing to the 'Add Snapshot' button

3. In the next section, choose the type of Snapshot, add a property name, and define the element via it’s CSS selector. Click the snapshot target icon to bring up a visual element selector.
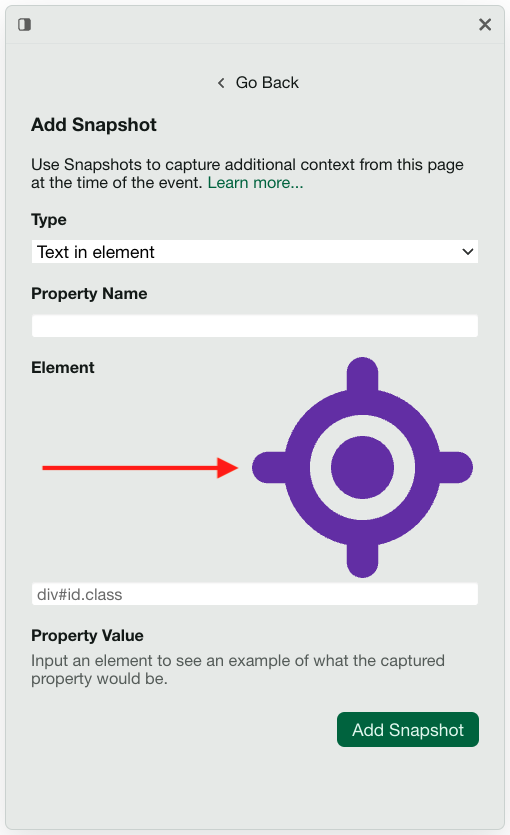
The 'Add Snapshot' pop-up with an arrow pointed at the snapshot target icon

4. Click the Add Snapshot button, which will take you back to the define event section. Click Next, complete the create definition fields, then click Define Event to save your new event with snapshotted data.

The 'Create definition' pop-up with an arrow pointed at the 'Define Event' button

Add Snapshots via the Events Page

To create a snapshot to add to an existing event, complete the following steps:

1. Navigate to Definitions > Events and click on the event you want to add a Snapshot to.

2. On the event details page, click the + Add Snapshot button, then configure the Snapshot fields. You can use the Property Name field to add an existing Snapshot, or create a new one by adding the new Snapshot name and setting the rest of the fields.
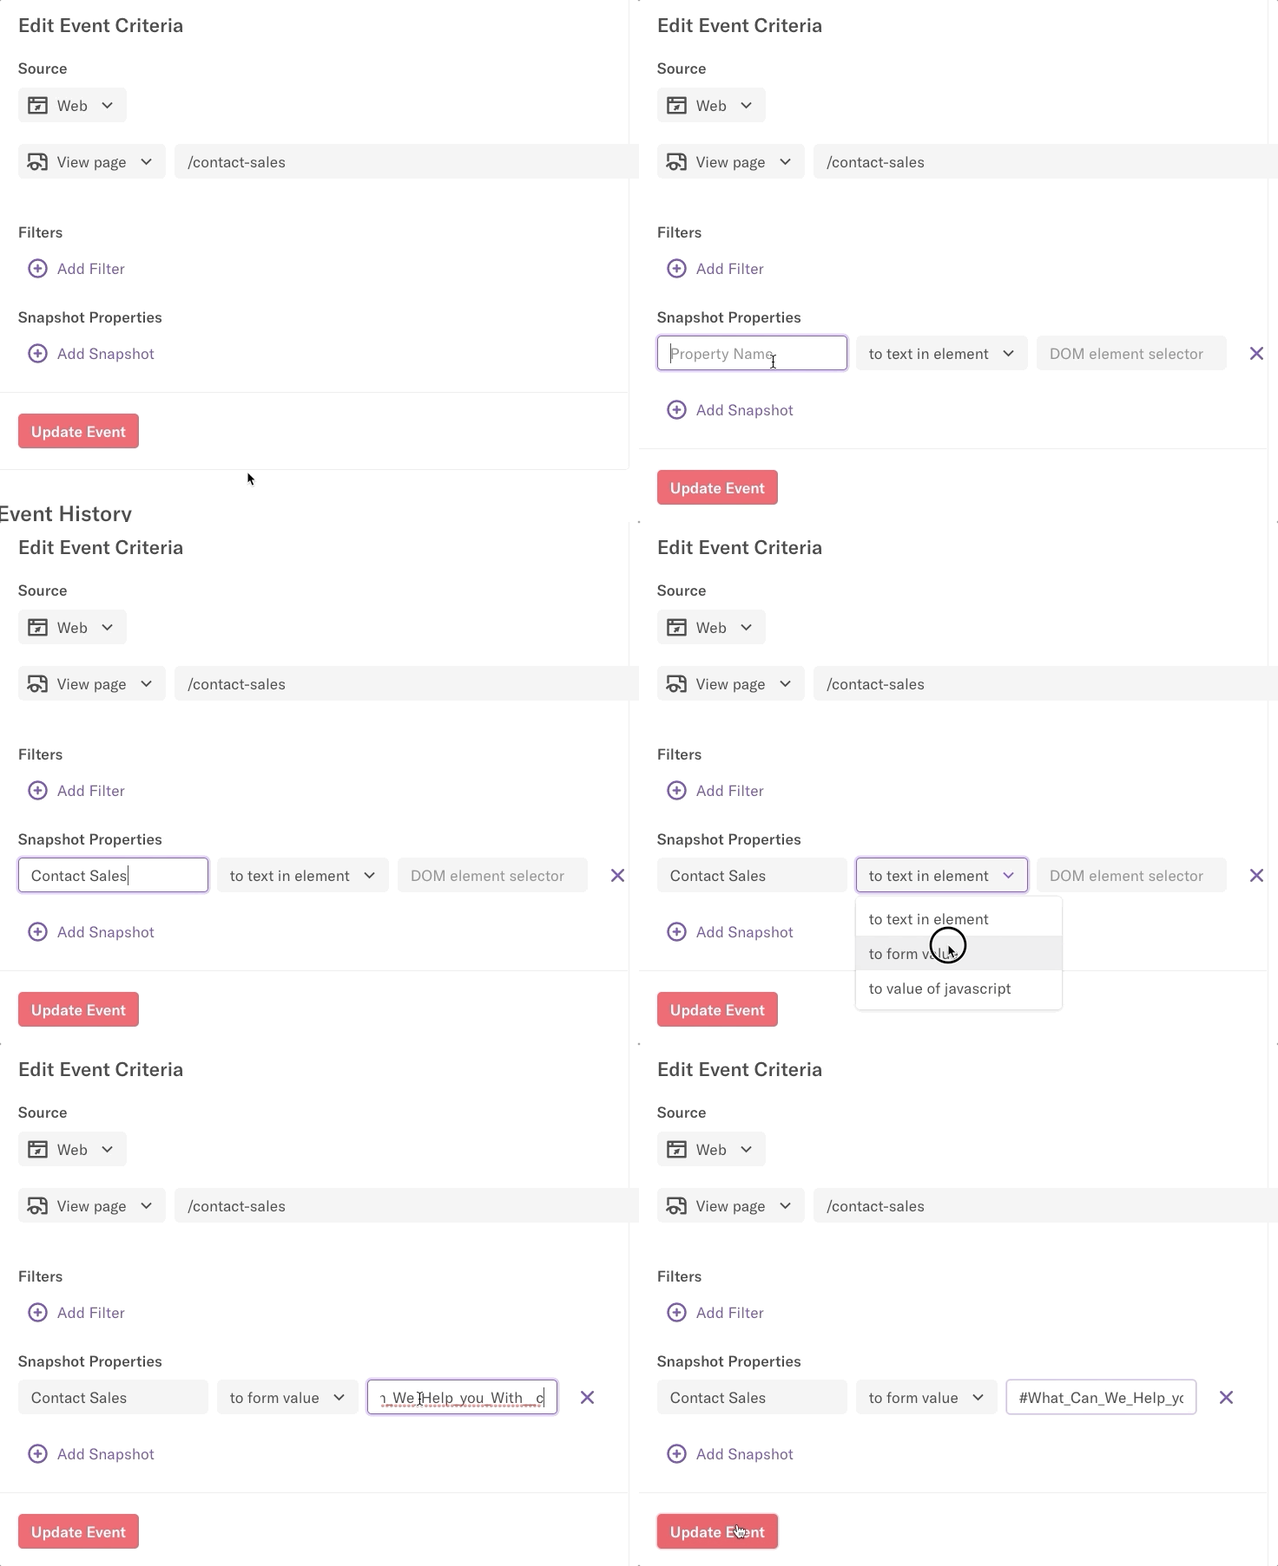
Adding a snapshot via the 'Edit Event Criteria' section of the event details page

3. Last but not least, click the Update Event button to save this Snapshot to your event.

Use Cases

The use cases below are for non-developers to capture additional metadata on event properties. For developer use cases where Snapshots are used to trigger JavaScript, see Executing JavaScript using Snapshots.

Capture Size of Item When Added To Cart (Single Event on Page)

You can use a Text in Element Snapshot to capture data, such as the size of an item, as an event property on an event.

In the example below, we define an event on the Add to Cart element, and we capture the selected size as Size. The first step is to use the Event Visualizer to define an event on the Add to Cart element. Once we’ve selected the element for our event, we can click Add Snapshot… in the Event Visualizer to add a Snapshot on this event:

To capture the size of the item added to the cart, we’ll set our Snapshot to Text in Element to capture the text within a specific element (1). We’ll name our Snapshot what we want the property to be called in Heap (2). 

Next we’ll use the Snapshot selector tool (3) which allows us to target an element on the page (similar to how we defined the event). With the Snapshot selector tool enabled, we’ll click the element we want to capture as a Snapshot (4). If all goes well, you should see a preview of what the property will look like once it’s captured:

Once saved, the event will trigger whenever a user clicks the Add to Cart button, and the Snapshot will capture the size of the item as a property named Size.

Capture Name of Item When Item is Clicked (Multiple Events on Page)

The previous example demonstrates how to define a Snapshot for a single element on the page; what if there are multiple elements on the page that can trigger the event all with their own elements we want to capture as Snapshots?

Below is an example of this; there are multiple elements that can trigger our Click on Item event, and we want to capture the name of the item that’s clicked as a Snapshot. To capture the item names as a Snapshot, simply use the Snapshot selector tool (1) and select one of the item names (2). 

Heap will automatically detect that the item name is associated with the closest event; once the event is saved, whenever a user clicks on an item, Heap will traverse the page to capture the corresponding item name as a Snapshot property.

Capture Company Name From Sign Up Form (Text Input Field)

To capture users’ inputs on an input field, such as a text input, we can use the Form Value Snapshot to capture the value of an input field. 

In the example below, we have an event defined on the Get demo button, and we want to create a Snapshot that captures what the user inputs for Company Name. We’ll want to make sure that our Snapshot is set to Form Value (1), and we can use the Snapshot selector tool (2) to define a Snapshot on the text input field (3).

Capture Search Queries

To capture search queries entered into a search bar, we can use Text to Element to capture the text in that element.

In the example below, we have an event defined on the Help Center search toolbar, and we want to create a Snapshot that captures what the user types in as a search query. We’ll want to make sure that our Snapshot is set to Text in Element (1), and we can use the Snapshot selector tool (2) to define a Snapshot on the text input field (3).

Capture Radio Form Value 

We can also use the Form Value Snapshots to capture users’ inputs for elements such as radios and checkboxes. The example below demonstrates how to define a Form Value Snapshot for radio buttons (this is the same process for checkboxes).

In order for Heap to detect that all of the radio buttons are related, the name attribute for the input must be the same for all radios in the group. In the example below, each radio has name=”role-card”.

We’ll want to make sure that our Snapshot is set to Form Value (1), and we can use the Snapshot selector tool (2) to select one of the radio buttons in the group. 

Capture Screen Dimensions

You can capture screen dimensions to attach to a pageview event by using the JavaScript snapshot below. We recommend attaching this event to any ‘view pageview’ event, which will attach it to all pageviews.

Name: Screen Dimensions

JavaScript Snapshot: window.screen.width + ' x ' + window.screen.height

To analyze this Snapshot, set up a Graph and group by this property to make sure that your product looks good on all the most popular screen sizes. This is handy for both designers and product managers. An example screenshot of how this would look on the Event details page in Heap can be found in the Pageview Snapshots section below.

Capture Orientation

You can also capture screen orientation (on pageload only: APIs for tracking orientation changes are not supported across all popular browsers). This is helpful for understanding how users are consuming your content. This gives you the data to understand if it’s worth optimizing for different views. Use the snapshot below to capture screen orientation:

Name: Screen orientation

JavaScript Snapshot: (function() { if(window.innerHeight > window.innerWidth){ return "Vertical" } else { return "Horizontal" } })();

Using Snapshotted Data in Custom Properties

Custom properties are configured on a per-event basis and are limited to 255 characters. Any changes to a custom property take effect in less than 5 minutes.

Custom properties are triggered by a user’s interaction with the CSS selector in the defined event. As a result, they are available to use in analyzing the events on which they were defined, but will also be applied to other defined events if another event definition uses the same selector.

Note: Custom properties are not yet available for iOS.

Pageview Snapshots

When using the Event Visualizer as presented above, you’re able to define custom properties that are attached to interaction events (clicks, form submissions, etc.). If you’re looking to apply custom properties to a pageview event when a page loads (and all subsequent events on this page), then you’ll need to define a Pageview Snapshot within our Events tab manually.

Pageview Snapshots allows you to attach custom properties to any pageview as well as all events that occur on that pageview. This allows you to enrich your dataset by adding custom properties through a point-and-click interface or custom JavaScript written in Heap’s UI. This means there’s no need to commit to your codebase and wait for a release cycle.

Using Pageview Snapshots, you can:

  • Add properties (such as a logged-in state) to analyze how behavior changes when someone is logged in vs. logged out (similar to our addEventProperties API example).
  • Understand how the number of items in a cart impacts consumer behavior, or add category information to all events in an eCommerce browsing experience.
  • Complement Heap data with metadata that already exists in your data layer. Simply add properties you store on the client-side in a JavaScript object to automatically attach to all events that Heap captures.
  • Call other client-side methods to trigger other behavior or send event data to other services when a pageview event occurs.

To attach a custom property to a pageview:

  1. Define an event for the pageview event of interest
  2. Add a custom property from the text in an element or through a custom JavaScript expression

Here’s an example of our use case for capturing screen dimensions with Snapshots:

An event with snapshot properties for logged in, window width, and window height defined

Snapshot Permissions

By default, only Admins and Architects can access Snapshots. You can set up custom roles to grant or revoke this permission for other roles.

Was this article helpful?

Yes No

Thank you for your feedback!

Last updated April 19, 2020.

custom propertiespageview snapshotssnapshots
  • Blog
  • Partners
  • Security
  • Terms
  • About
  • Careers
  • Privacy
  • Contact Us

© 2021 Heap, Inc.