We provide visual labeling as an easy way to create events without using code. However, if you are familiar with your site’s markup, you can manually create events via their base event definitions. To do so, complete the steps below.
- Navigate to Data > Labeled events, then click the Label event or property button and select Event in the drop-down.
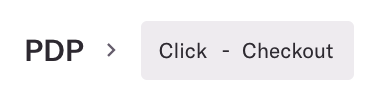
2. Add a category and name to your event. For our example, we are manually defining a click on the checkout button as it appears on the product page.
If you are creating a personal event, click on the Publish To Shared Space toggle to turn it off. You’ll see the category switch to Personal.
3. Select a Source. The options listed might include the following based on which platforms you have Heap installed on and integrated with.
- Web: An event that happens on your website.
- iOS/Android: An event that happens in your mobile app.
- Integration (ex. Shopify, Salesforce): An event from an integration you have connected Heap with.
- Custom: Select this option if you are setting an event based on data pulled in via one of Heap’s APIs. See Using Custom Events to Build New Events below to learn more.
- Combo: Select this option to combine multiple existing events into one. See Combo Events below to learn more.
Depending on the type of source you’ve selected, you may need to select a base event that you will build the event definition on, then the custom criteria for that event. See the platform-specific sections below for more details:
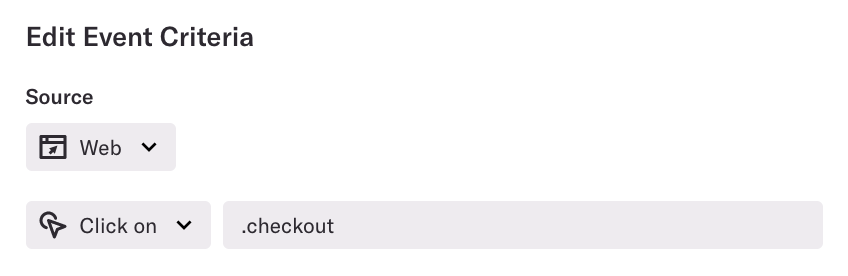
For our example, we’ll label this as a web event with the base event Click on, using the CSS selector for a click on the checkout button as the definition for that event.
4. Add any filters or snapshot properties as needed. Only Admins and Architects can add snapshots.
5. Click Label Event & Request Confirmation to create your new event.
Once submitted for verification, an event definition can’t be edited. However, you can always cancel the submission, edit the event further, and resubmit as needed. For more info on how the verification process works, see Definition Verification.
For a deep dive on defining events with Visual labeling and CSS, check out our Creating Event Definitions course in Heap University.
Web
There are 5 types of base events we capture in Heap out-of-the-box that you can use to manually label new events:
View page: A pageview (MDN reference)Click on: A click on an element (MDN reference)Change on: A change in aninput,textarea, orselectelement (MDN Reference)Submit on: A form submission (MDN Reference)Start Session: A session
Explore pageviews
What triggers a pageview?
For details on what triggers a pageview, see How does Heap define a pageview?
Recommended pageview events & properties
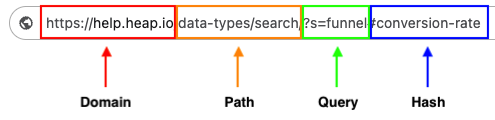
There are four key properties sprovided by the pageview URL, which you can draw off of to set up your pageview: domain, path, query, and hash.
We’ve provide a list of recommended pageview events to create based on the popularity of those pages. Setting up these pageviews as events allows you to dig into engagement with those pages to better understand user behavior. For more info, see Pageview Suggestions.
Best practices for defining pageviews
Here are some best practices for creating pageview events:
- Though you can create pageview events based on any of the four properties above, for accuracy, we recommend creating pageview events based on their path or hash.
- To track views on elements that don’t trigger a pageview (URL change), such as pop-ups or SPAs, use custom track events.
- If the URL structure of your site changes, let your Heap admin know so they can update events accordingly. You can also use Heap’s event repair flow to evaluate and fix broken events.
To better understand what modifiers to apply to these events, we’ll walkthrough how common CSS elements should be written in Heap event definitions.
Tags, classes, and ids
Tag refers to the tag name (e.g. <input> ). In line with standard CSS practices, in Heap, this is written as input.
A class name comes after the attribute class=. Classes are prepended by a period, for example .email.
An id comes after the attribute id=. IDs are prepended by a hash, as in #user_password.
An attribute is the part of the markup that is not an id or class, such as placeholder or name. Attributes are contained in square brackets, as in [name=email] or [placeholder="Email Address"]. Quotes are only required if the attribute contains a space.
In this example, you would create:
<form accept-charset="UTF-8" action="/login" class="login signupform" id="new_user" method="post">
  <label>Email</label>
  <input autofocus="autofocus" class="email" id="user_email" name="email" placeholder="Email Address" tabindex="1" type="email">

  <label>Password</label>
  <input class="field with-reset" id="user_password" name="user[password]" placeholder="Password" tabindex="2" type="password" />

  <input class="button b-big" name="commit" tabindex="3" type="submit" value="Sign In" />
</form>- A pageview as
View page: /signup. - A click into the email field as
Click on: .emailorClick on: [placeholder="Email Address"]which uses the attribute instead of the class. - A change in the password field as
Change on: #user_password. - A form submission as
Submit on: #new_user.
You can combine tags, classes, and IDs in the same element by stringing them together. For example, Change on: input#user_email.email.
CSS character limit
Heap has a 1024 character limit for parent hierarchy capture and truncation.
If there are too many characters in the hierarchy between the child selector and the parent selector, your definition won’t work.
To combine selectors in a hierarchy, add a space between the tags, classes, and IDs. For example, let’s say you have more than one email form on a page: one to sign up, another to subscribe to a newsletter, and both email fields are labeled the same way. You can use the form ID to specify which form to target; Change on: form#new_user #user_email which will limit the event to just the new user sign up form; and Change on: form#newsletter #user_email, which would limit the event to the newsletter form.
Attributes
To use attributes in an event definition (here defined as attributes other than classes or IDs, and which includes things like name, type, and anything that starts with data-*) surround the attributes’ key and value elements with brackets. For example, name="email" from the sample markdown above becomes [name=email] within Heap’s event creator.
You can also use simplified attribute selectors to match data attributes:
[key]Targets elements with a key attribute[key=value]Target elements with a key attribute that’s value.[key*=value]Targets elements with a key attribute containing a value within it.[key^=value]Targets elements with a key attribute starting with value.[key$=value]Targets elements with a key attribute ending with value.
Please note, we do not capture the following attributes:
data-ember-actiondata-react-checksumdata-reactidmaxlengthonclickonsubmitstylevalue(Note: specific toinputelements)
We only capture class and ID, not attributes, on svg elements.
iOS, Android, React Native
Only select versions of our mobile SDKs support visual labeling. For more info, see Do Heap’s mobile SDKs support visual labeling?
We provide the option to manually create mobile and React Native events from the events page. However, we strongly recommend creating new mobile and React Native events via visual labeling or the live data feed. These allow you to verify the accuracy of the event by testing it via a device or emulator.
When creating iOS, Android, and React Native events, you’ll use autocaptured events and properties as a base, then apply filters to create your new event.
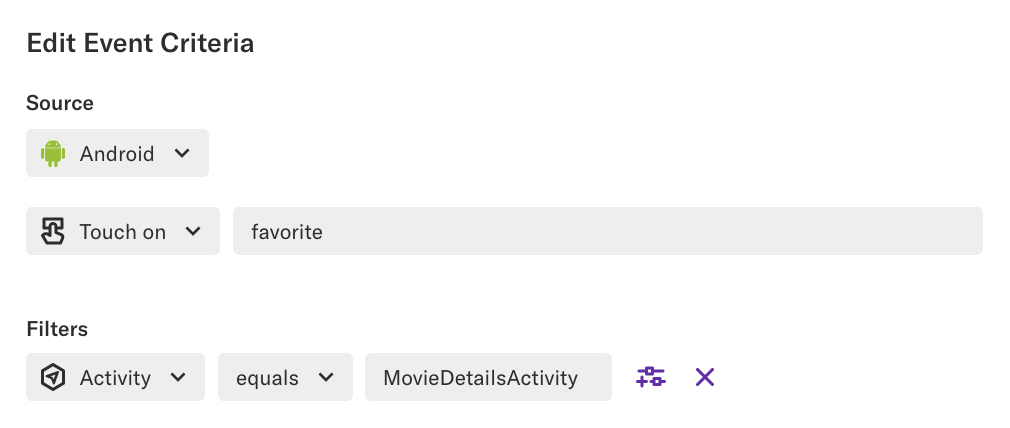
For example, we have a base ‘touch on’ event:

Which you can use to create a touch element and apply a filter to specify the criteria for this event definition:
Base events & properties for labeling mobile events
Out-of-the-box, Heap provides the following mobile events which you can use as a base, listed on the left. Each is labeled based on the base property in the middle column. Key properties that are often used to create a new event based on this one are listed on the right.
Android
| Event | Base property | Key properties |
|---|---|---|
| View Screen | Full Activity | n/a |
| Fragment Transitions | Added Fragments | Activity, Full Activity, Visible Fragments |
| Page Transition | Transitioned-to Page Title | Transitioned-to Page Class, Transitioned-from Page Title and Class, View Pager Swiped, Target Resource ID |
| Touch On | Hierarchy | Target Text, Target Class, Full Target Resource ID |
| Edit Field | Hierarchy | Target Text, Target Class, Full Target Resource ID |
| App install/Upgrade | Current Version Name | Is Upgrade |
iOS
| Event | Base property | Key properties |
|---|---|---|
| View Screen | View Controller | Title, Accessibility Identifier, Accessibility Label |
| Touch On | Hierarchy | Target Text, Target View Class, Target View Name, Accessibility Identifier, Accessibility Label |
| Action Methods | Action Method | Target Text, Target View Class, Target View Name |
| Edit Field | Hierarchy | Target View Class, Accessibility Identifier, Accessibility Label |
| Gesture Recognizers (any event related to gestures, such as panning, zooming, etc.) | Target View Ivar | n/a |
| App Install/Upgrade | Current Version Name | Is Upgrade |
React Native
| Event | Base property | Key properties |
|---|---|---|
| View Screen | Screen path | Navigation Action, Screen Name |
| Touch On | React hierarchy selector | Target Text, Is Long Press |
| Change On | React hierarchy selector | n/a |
| Edit Field | React hierarchy selector | Placeholder Text |
| Page Transition | React hierarchy selector | Page Index |
Generally, it’s important to make sure that the event is labeled by a set of properties that specifically refer to that particular interaction. When creating mobile events, consider the following:
- Can this event be specifically labeled based on the default property it relies on?
- Do the property values have semantic meaning (e.g. “RegistrationFormScreen”) or are they generic (e.g. “FormScreen”)?
- Are certain key property values being reused throughout the app?
Limitations
Currently, Heap can’t be used to capture the following types of events.
- Push notifications: As a workaround, you can send custom server-side events as push events. However, since these won’t be sessionized, and interactions with these push events will be part of a client-side session, using this workaround will inflate your session count and you won’t be able to conduct session-based analysis.
- App crashes: Heap is not intended to be used as a replacement for Crash analytics solutions. A workaround is to catch otherwise-uncaught exceptions to send as a custom event to Heap.
- Uninstall events: Heap can’t collect data on when your app is uninstalled.
Additionally, we do not provide a way to tell if an event was captured while the app was offline.
Best practices
We recommend reviewing the best practices sections of the iOS and Android visual labeling guides, as most of these also apply to defining mobile events via the events page.
Get the tools and knowledge you need to deliver outstanding digital experiences that your customers will love. Check out Down the Funnel, the ultimate resource hub for digital builders.
React & Angular Apps
Using a Single Page App framework like React or Angular? Be sure to write distinct classes or IDs or make use of data-attributes so you can accurately create events based on those selectors.