Snapshots give you the ability to capture additional metadata that isn’t autocaptured by Heap out-of-the-box. Examples of what you can capture with snapshots:
- Searches entered by users in any search bar on your site
- The price, item name, or star rating of a product when it is added to a customer’s cart
- Form selections, such as if a checkbox, radio button, or date field in a form was clicked or not
Normally, you’d have to resort to custom tracking code to bring in these additional properties. With snapshots, however, you can take a snapshot of this relevant data on a page, and attach them to events without the need to write extra code.
Community Quote
“One of the challenges our team has been faced with as of late is logging changes in product status (ie. in stock, sold out, backordered) for when we need to reference certain points in time. Through Heap, we were able to set up snapshots to capture the statuses for when a user engages with a product on the product page. So now when needed, we can just look at that certain day and what the engagement/statuses were.”
From Using snapshots to log changes in product status (ie. in stock, sold out, backordered)
Some important notes about how snapshots work:
- Because you are defining new metadata for Heap to capture, snapshots are not retroactive: they begin collecting data from the point when they were first created. So if you created a Snapshot on 5/14/2023, you’ll only be able to analyze that snapshot data going all the way back to that date.
- Snapshots fire based on event selectors only, regardless of event filters. Any event filters present will not prevent a snapshot from firing.
- Archiving and then restoring archived events with snapshots results in the loss of data from the duration of time when the event was archived.
- Snapshots are not supported for mobile installations. However, they’re supported on web mobile installations, including WebViews.
Choosing between autocaptured and snapshotted data
In cases where you’re trying to decide whether to use an autocaptured property or a snapshot, we recommend going with an autocaptured property. For example, if you want to track search terms, and the search term shows up in the URL of the page that the search was conducted on, you can set up a property to capture that search term based on the autocaptured Path property instead of a snapshot. This is preferable because autocaptured data is retroactive and provides a wealth of additional data points to work with.
Creating snapshots
Before we begin, let’s go over the different types of snapshots you can create:
- Text in element: An element of your page as described in the DOM element selector. Each time someone interacts with this element, the full text inside the nearest matching element gets extracted, trimmed, and attached to the event as a property.
- Form Value: The value of a form field. If you’re using snapshots to capture the text added to a form field, this is what you should select.
- Value of JavaScript: Any JavaScript expression. Each time someone interacts with this element, the JavaScript expression gets evaluated, and the return value gets attached to the event as a property. To see examples of see Use snapshots to execute JavaScript.
Note that once your snapshot is saved, it will take 2-10 minutes for that change to show up in your heap.js file. Once heap.js is updated, it should show up in the dashboard immediately after it’s captured.
Create snapshots via visual labeling
Snapshots can only be added to shared events, not personal events.
You can label new snapshot properties to be attached to a new event via visual labeling. This flow is meant for a use case where you are creating a new event and a snapshot at the same time.
To create a snapshot via visual labeling, complete the steps below:
1. In Heap, navigate to Data > visual labeling. Enter the URL for the app you wish to take this snapshot on, then click Launch.
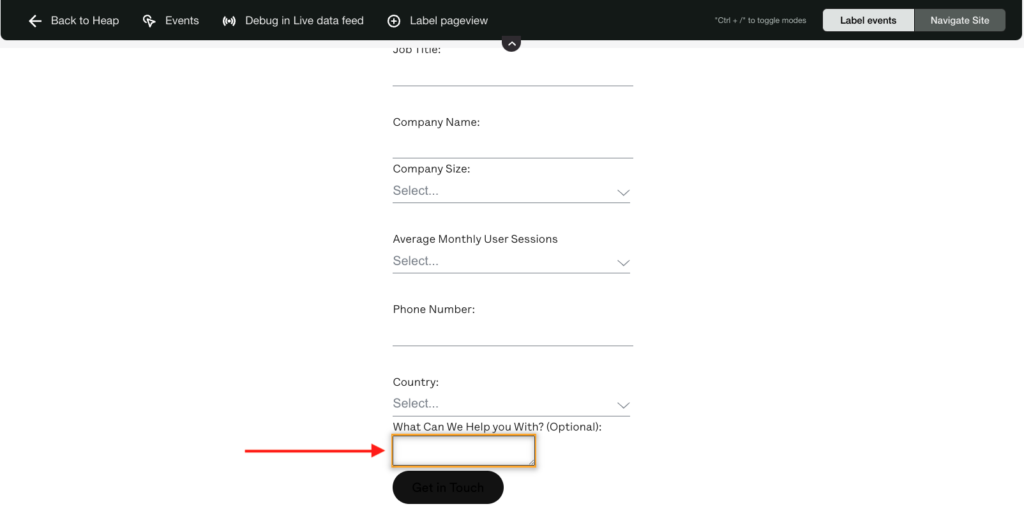
2. From within the visual labeling interface, select the element on the page you want to create a snapshot for. In an example from Heap’s contact page, we may want to collect and analyze responses to the ‘What can we help you with?’ question, so we’ll click on this element.
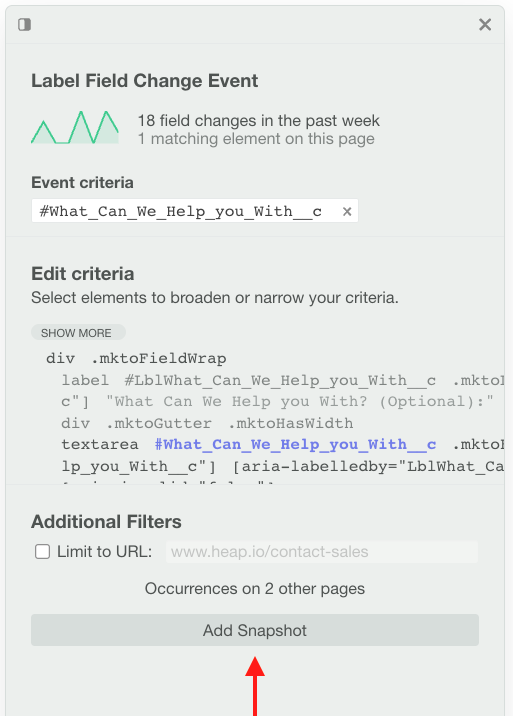
2. A pop-up will appear for you to label the event. Click the Add Snapshot button at the bottom of that pop-up.
3. In the next section, choose the type of snapshot, add a property name, and label the element via it’s CSS selector. Click the snapshot target icon to bring up a visual element selector.
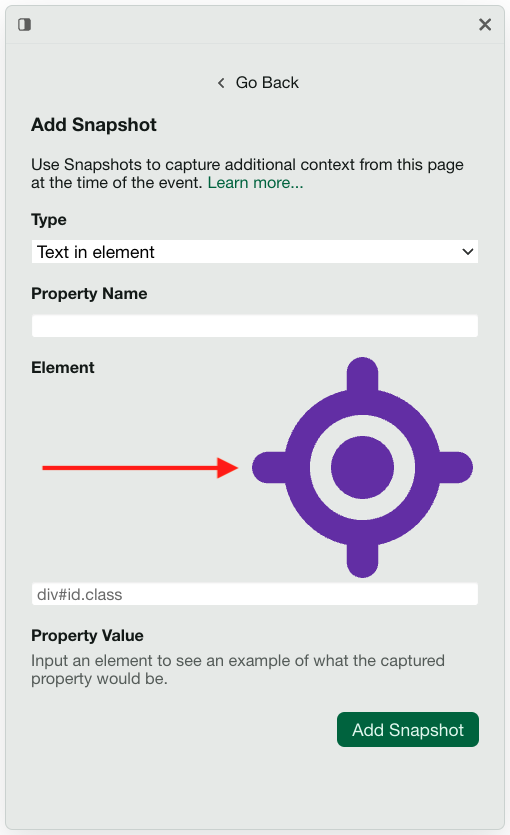
4. Click the Add Snapshot button, which will take you back to the label event section. Click Next, complete the create label fields, then click Label Event to save your new event with snapshotted data.
Add Snapshots via the events page
To create a snapshot to add to an existing event, complete the following steps:
1. Navigate to Data > Labeled events and click on the event you want to add a snapshot to.
2. On the event details page, click the + Add Snapshot button, then set up the snapshot criteria. You can use the Property Name field to add an existing snapshot, or create a new one by adding the new snapshot name and setting the rest of the fields.
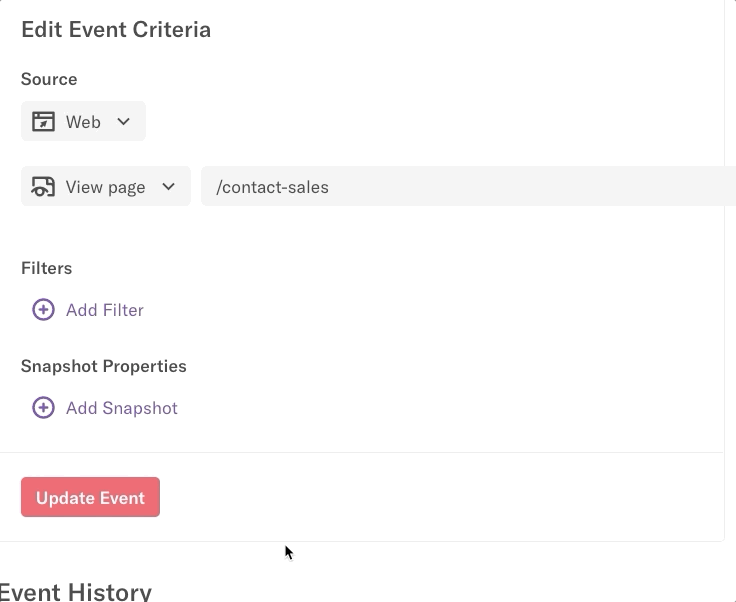
3. Finally, click the Update Event button to save this snapshot to your event.
Use cases
For a full set of Snapshot use cases, see the Snapshots section of the Help Center.
Snapshot permissions
By default, only Admins and Architects can access snapshots. You can set up custom roles to grant or revoke this permission for other roles.