This integration is Bi-directional; data can be sent both in and out of Heap.
Overview
The Heap HubSpot integration automatically captures all of your email journey touchpoints as events and all contact info as user properties in Heap. By integrating HubSpot with Heap, you’ll be able to answer the following questions (and more!):
- How effective are different campaigns at driving conversions?
- How many email touches does it take to re-active cart abandonment?
- Does engagement in a journey improve retention over time?
For more information about the benefits and requirements of this integration, see Heap’s marketplace listing in Hubspot.
Setup (Source)
Email Join Key Required
You need to have email addresses attached to your users in Heap to match data between Heap and this source. This property can be set to identity or any custom user property in Heap.
If you are not currently sending email addresses into Heap you will need to use Heap’s APIs to do so. Learn more about attaching email data to users via Heap’s identity API.
Need help? Please post in Community or contact us via the Get support page in Heap.
To configure the HubSpot source, you’ll need to have the following privileges:
- Admin or Architect privileges in Heap
- Admin privileges in HubSpot
To get started, navigate to Integrations > Directory > Hubspot. On this page, click the Set Up button in the top-right. You’ll be prompted to sign into HubSpot to authorize the integration with Heap.
You will then be prompted to specify an email property if you haven’t set one up already for your account. The selected user property needs to be the user property associated with your users’ email addresses, as this is the property HubSpot uses when sending Heap data about your users.
Once the email property has been sent, you’ll be prompted to connect your HubSpot account and be redirected to authenticate in HubSpot. Once authenticated, you’ll be redirected back to the HubSpot source page in Heap with a successful confirmation message.
Upon completion, the source connection page will present Waiting For Data until the first event data from HubSpot is seen by Heap, at which point the connection status will change to Connected.
Please don’t hesitate to reach out if you have any questions or if you’re running into trouble with the source connection process!
Data Format
Events
HubSpot events are ingested as the following event types in Heap. Please reference HubSpot’s email event documentation to see what specific properties Heap ingests and their respective descriptions.
Bounced Email: The recipient’s email server could not or would not accept the message, and no further attempts will be made to deliver the message.Changed Email Subscription: The recipient changed their email subscription in some way.Clicked Email Link: The recipient clicked on a link within the message.Deferred Email: The recipient’s email server has temporarily rejected the message, and subsequent attempts will be made to deliver the message.Delivered Email: The recipient’s email server has accepted the message, and the message has been successfully delivered to the recipient.Dropped Email: The message was rejected, either by HubSpot or by our delivery provider, and no attempt will be made to deliver the message.Forwarded Email: The recipient forwarded the message.Marked as Spam: The recipient flagged the message as spam.Opened Email: The recipient opened the message.Printed Email: The recipient printed the message.Processed Email: The message has been received by our delivery provider, which has indicated it will attempt to deliver the message to the recipient’s email server.Sent Email: The message was sent to and received by our delivery provider, which has queued it for further handling.
User Properties
Heap will also automatically capture all properties available on contacts in HubSpot as user properties in Heap. These properties will include standard properties like First Name or Last Contacted, though the complete list of properties is determined by your particular HubSpot setup and/or HubSpot’s connection to your CRM.
Starting or stopping the data flow
Once your integration has been successfully set up , there is a toggle in the Heap UI that allows you to start or stop the flow of data from Hubspot into Heap. Navigate to Integrations > Directory > and search for Hubspot to access the toggle.

Setup (Destination)
Prerequisites
To send data from Heap to Hubspot, you’ll need the following permissions:
- Admin or Architect privileges in Heap
- General account access in Hubspot
Step 1: Enable the integration from Heap
From Heap, navigate to Integrations > Directory > Hubspot and click the Set Up button under the Data Out card.

Step 2: Authentication
Click Continue to log in with your Hubspot account and add Heap as an authorized client.

Once you’ve authenticated successfully, you’ll be redirected back to Heap.
Step 3: Select a property to match users
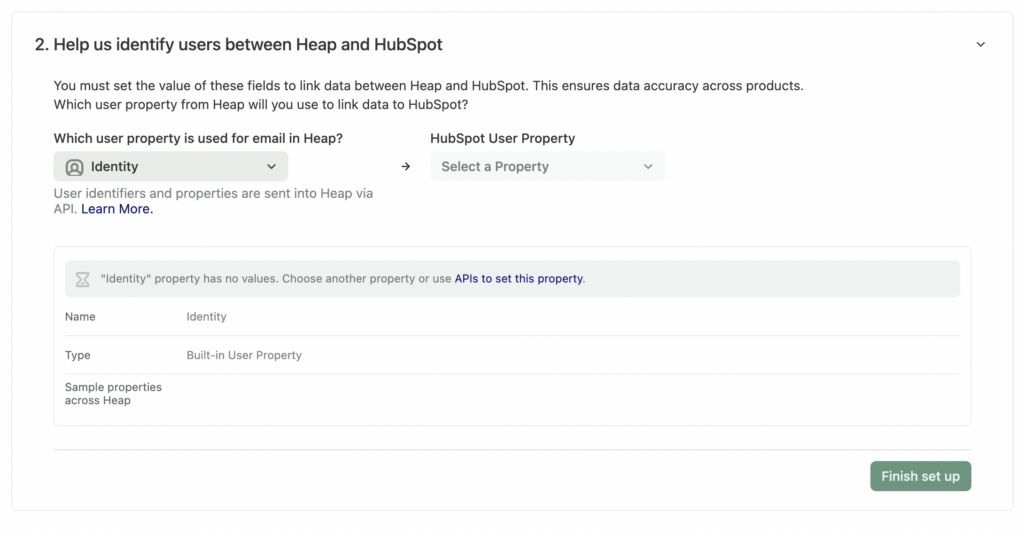
Choose the Heap ID and Hubspot ID that you want to use to match users between Heap and Hubspot. This is typically the user’s email address, though you can use any IDs that match. Click Finish set up.

When set up is successful, you’ll see a green checkmark next to the Data Out card.

Recurring Syncs
Now you can toggle on any defined segment to sync it into Hubspot as a list of contacts.
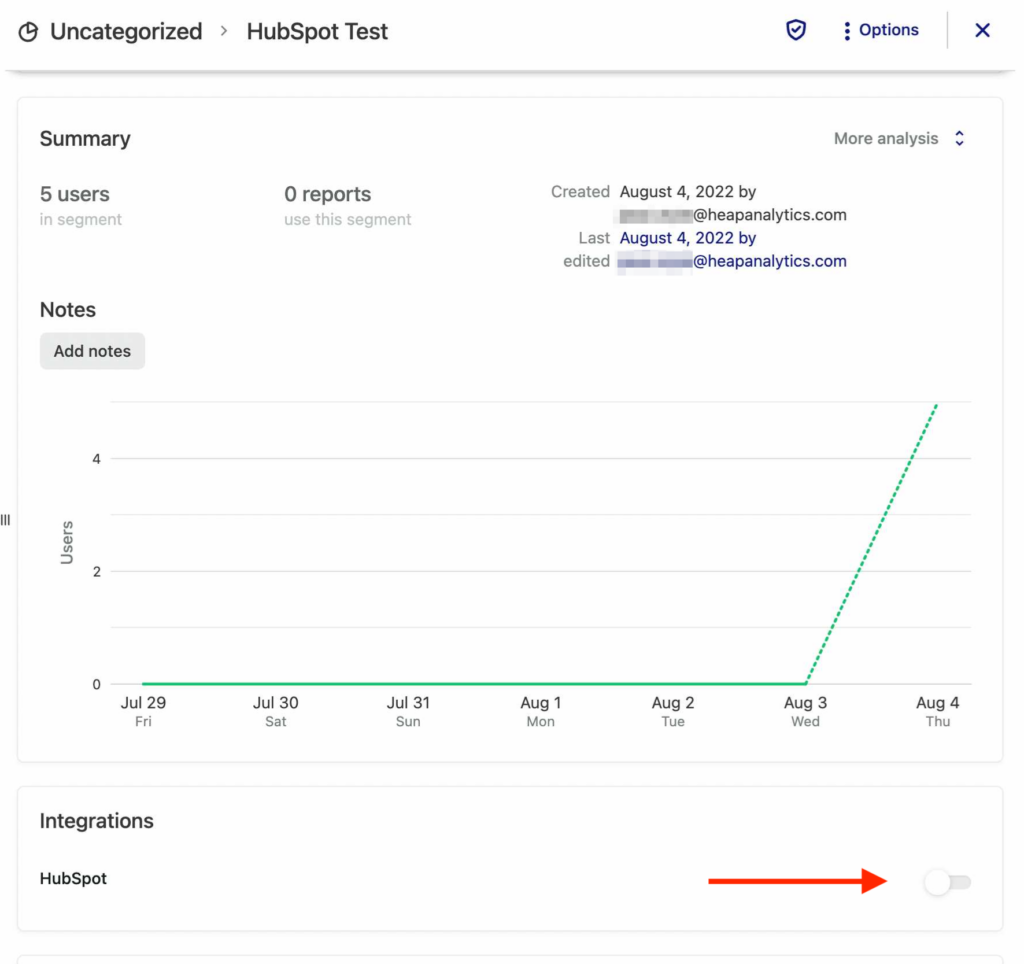
Navigate to Data > Segments and click on the desired segment. On the segment details page, scroll to the Integrations section and enable the toggle next to Hubspot.

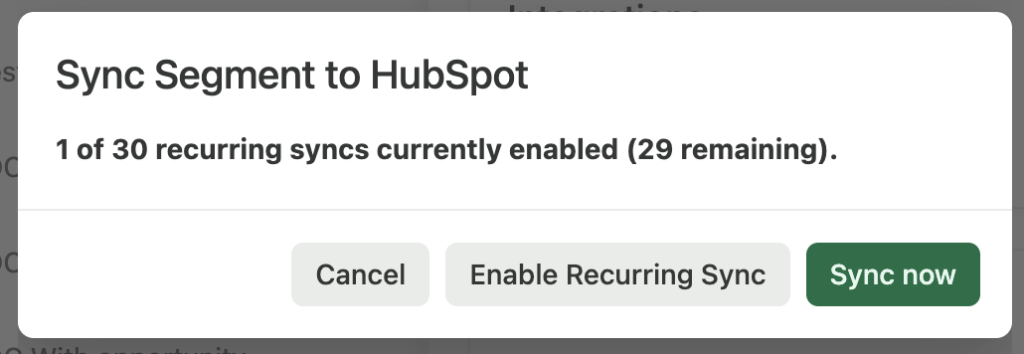
On the pop-up that appears, select either Enable Recurring Sync or one-time Sync (Sync now).

The segment will begin syncing immediately, and you should see a list of contacts in Hubspot with the same segment name within 2-5 minutes. We only allow you to have 30 segments recurrently syncing to Hubspot at one time. After the first sync completes, the segment will update every 4 hours.
If a user exists in Heap but not Hubspot, Heap won’t create them in Hubspot. Empty entries won’t be synced.
View contacts in Hubspot
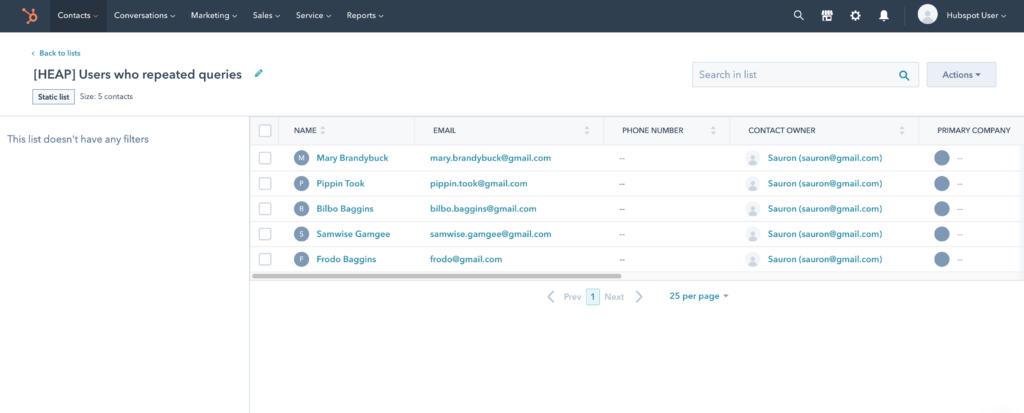
Once your sync has completed, your data will be in Hubspot as a list of contacts. Go to Hubspot and navigate to Contacts > Lists to view it.

Disabling your integration
To completely disconnect or disable your integration after it has been set up, please contact us via the Get support page.