Overview
The Heap Intercom integration enables you to take action in Intercom using Heap data and then measure the impact back in Heap.
Intercom Data into Heap
Automatically send key conversation events to Heap, so you can measure the impact of customer interactions in Intercom on product engagement across the entire customer lifecycle.
Supported conversation types include:
- chat
- push
Note: This integration currently does not support measuring Product Tours.
Intercom is the customer messaging platform that drives faster growth through better relationships. With Intercom, you can initiate targeted conversations with your customers on your website, inside your web and mobile apps, and by email.
By integrating Intercom with Heap, you’ll be able to:
- Analyze the effectiveness of Intercom messages in driving key actions in your product and long-term user retention.
- Use usage over time charts, funnels, retention curves, and other visualizations in Heap to get insight into how users engage with Intercom.
- Understand where users are initiating the most conversations.
- See the long-term impact of having Intercom conversations on user retentions.
Setup
Email Join Key Required
You need to have email addresses attached to your users in Heap to match data between Heap and this source. This property can be set to identity or any custom user property in Heap.
If you are not currently sending email addresses into Heap you will need to use Heap’s APIs to do so. Learn more about attaching email data to users via Heap’s identity API.
Need help? Please post in Community or contact us via the Get support page in Heap.
Note: The person performing the authorize step needs to have an admin role in Intercom to authorize successfully.
To set up the Intercom integration, navigate to Integrations > Directory > Intercom. On this page, click the Set Up button in the top-right. You’ll be prompted to sign into Intercom to authorize the integration with Heap.
Once you’ve integrated with Intercom, Heap will kick off an initial backfill of historical conversations and then update hourly with the most recent conversations. The initial backfill will pull in up to 40,000 conversations.
| Event | Description |
|---|---|
| Start Inbound Conversation | A user starts a conversation in the Intercom messenger. |
| Reply to Conversation | A user replies to a conversation started by an admin, bot, or team in the Intercom messenger. |
| Conversation was Closed | A user’s conversation in the Intercom messenger was closed by an admin. |
| Rate Conversation | A user rated the conversation on a scale from 1 to 5. |
| Property | Associated Event(s) | Description |
|---|---|---|
| Conversation ID | All | The Intercom ID representing the conversation. |
| First Message Author Email | Reply to Conversation | The email of the individual that started the conversation (only applicable to admins). |
| Assigned Admin Email | Conversation was Closed | The email of the last admin assigned to the conversation. |
| URL | Start Inbound Conversation Reply to Conversation | The URL where the user’s first message occurred. |
| Conversation Rating | Rate Conversation | The rating, between 1 and 5, for the conversation. |
| Conversation Parts | Conversation was Closed | The number of parts to the conversation, as described in Intercom’s developer documentation. |
| First Message Author Type | Reply to Conversation Conversation was Closed | The type of individual that started the conversation ( user, lead, admin, team or bot) |
| First Message Delivered As | Reply to Conversation Conversation was Closed | How the first message was delivered by Intercom (customer_initiated, automated, campaigns_initiated, admin_initiated, or operator_initiated) |
| First Message Type | Start Inbound Conversation Reply to Conversation Conversation was Closed | The type of message that started the conversation (conversation, push, facebook, twitter, and email) |
Running a Query
Step 1: Set up an event in Heap for the Intercom event you care about.
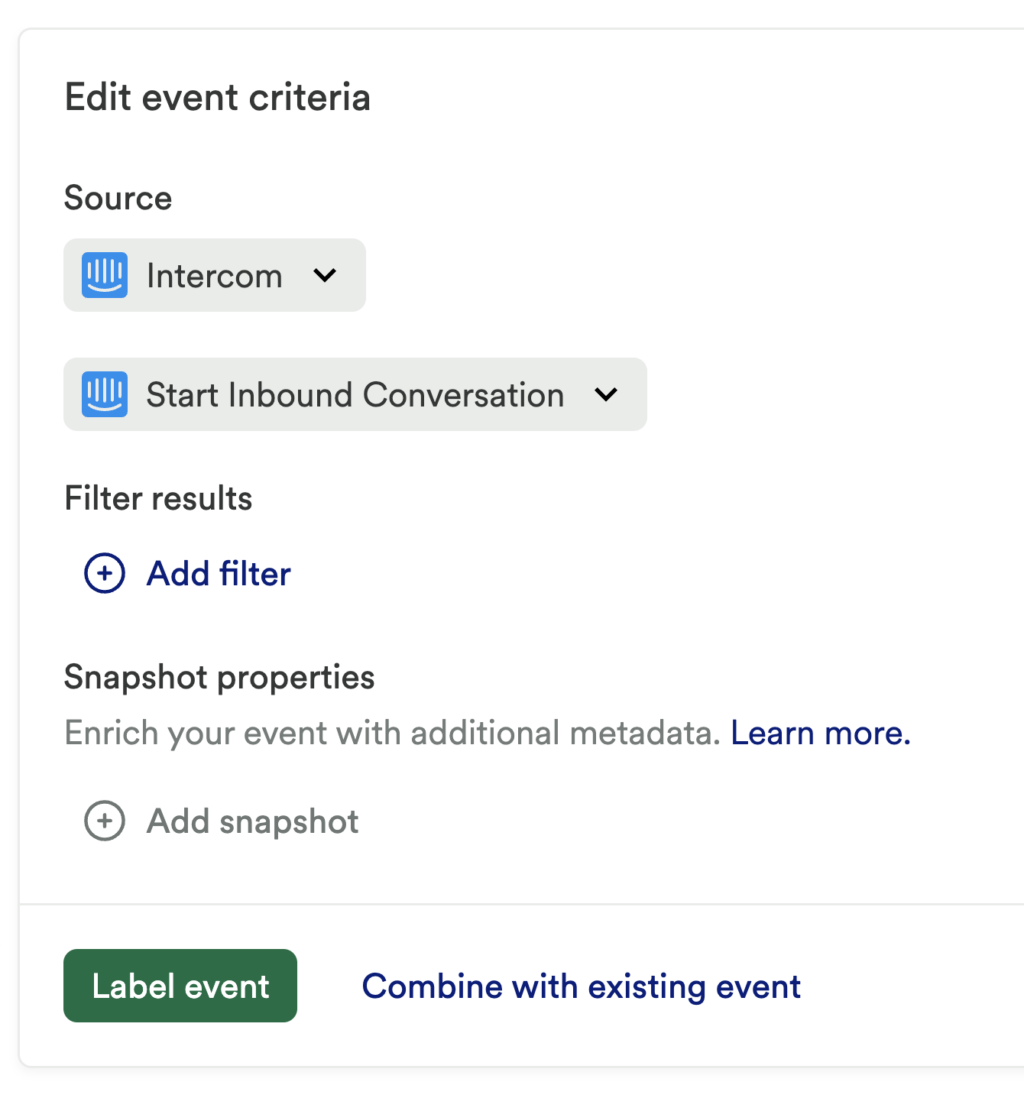
Navigate to Data > Labeled events and click Label event or property. Select event and choose Intercom as the source. In the example below, we’ve picked Start Inbound Conversation as our event type.

Step 2: Use one of Heap’s chart types to dig into the question that you have.
Don’t know what question to ask? Check out the following chart templates. Each template will walk you through how to answer common questions using the Intercom source.
- Are users initiating Intercom conversations more on certain pages over others?
- Does initiating an Intercom conversation result in higher retention?
- What impact does the quality of Intercom conversations have on long-term retention?
Heap Event Data into Intercom
To track events in Heap and forward them to Intercom, you can create a snapshot on any defined event in Heap and use that snapshot to trigger a ‘track event’ action into Intercom.
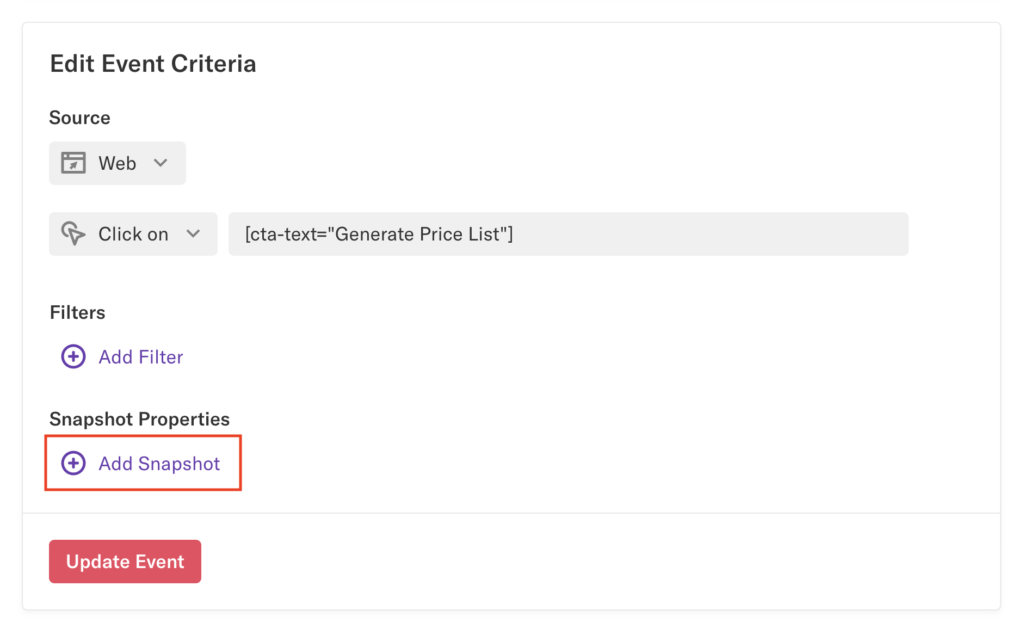
Step 1: Define an event in Heap and add a new snapshot property on the event from the events view.

Step 2: Set the property value to Intercom('trackEvent', 'event name'); where event name can be replaced with any event name you want to show up in Intercom for this event. See Intercom’s docs for more information about this track call.

Step 3: Test that event on your site and see if the event appears in Intercom.
Intercom Data Connector
Intercom data-out is only available for customers on a paid plan. To upgrade, contact sales@heap.io.
Heap’s integration with the Intercom data connector allows you to leverage behavioral segments in Intercom campaigns with no extra engineering work needed. You can create segments in Heap based on user activity, usage lifecycle stages, and key attributes about the user and sync them into Intercom as Tags. These Tags will be updated daily based on Heap data to support automated campaigns and workflows.
To set this up, navigate to Integrations > Directory > Intercom and click the Set Up button under the Data Out card.

You’ll be redirected to Intercom to log in as an Intercom Admin and grant Heap permissions to connect.

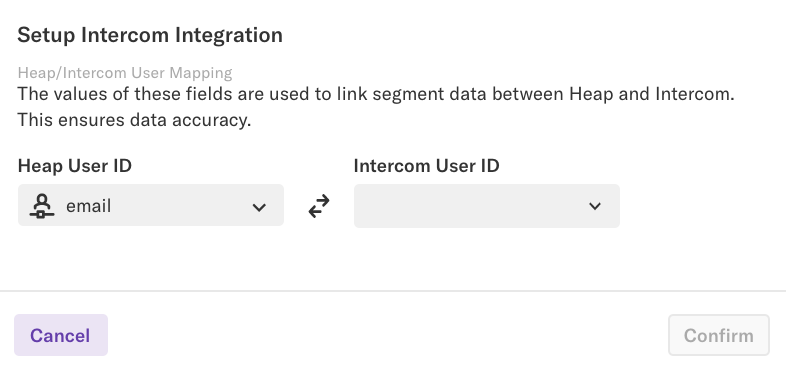
Once you have authenticated successfully, you will be redirected back to Heap and prompted to select the Heap ID and Intercom ID to use to map users between the two platforms. This is typically the user’s email address, though you can use any IDs that match.

Once you click Confirm, the Data Out section will show as connected on the Intercom page.

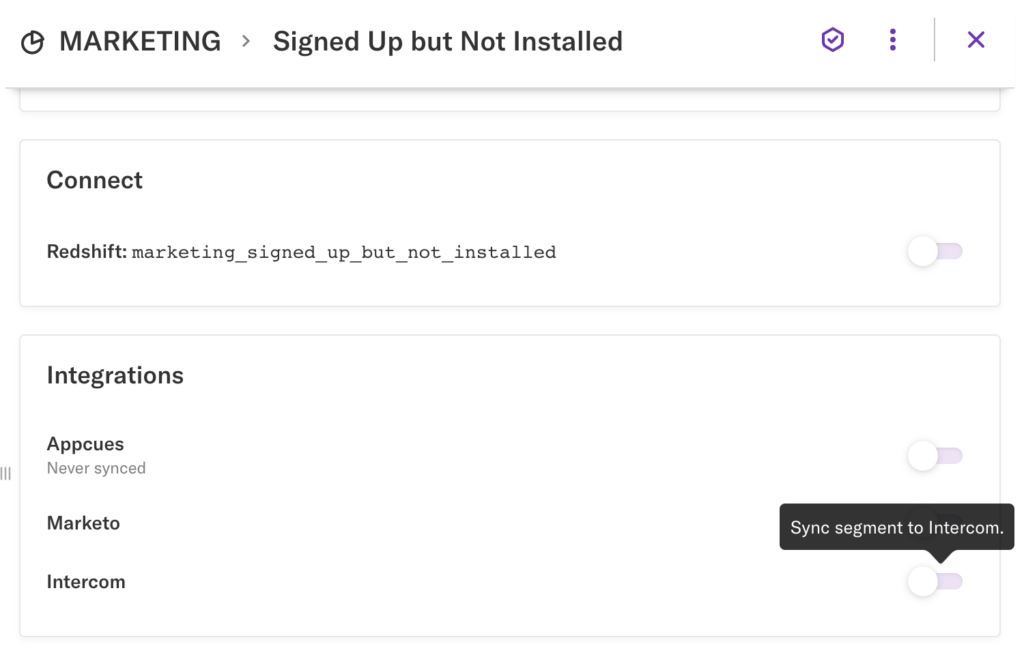
Now you can toggle on any segment to sync into Intercom as tags. To do so, navigate to Data > Segments, click on any segment, then in the Integrations section, click the toggle next to Intercom. The segment will begin syncing immediately, and you should see a tag in Intercom with the same segment name within 2-5 minutes. We only allow you to have 30 segments recurrently syncing to Intercom at one time. After the first sync completes, the segment will update every 4 hours.
