Partner-owned
This integration is set up and supported by this partner. For questions, reach out directly to their team.
This integration is Bi-directional; data can be sent both in and out of Heap.
Overview
Chameleon’s integration with Heap allows you to automatically see Chameleon events in Heap and send events and properties from Heap to Chameleon. This lets you better analyze your Chameleon Experiences alongside your other product data and better enable targeting of your Chameleon Experiences.
Here is a summary:
| Integration Direction | Benefits | Setup |
| Source: Chameleon data into Heap | Analyze Chameleon Experiences in Heap | One-click from Chameleon interface |
| Destination: Heap events into Chameleon | Target Chameleon Experiences based on Heap events | Within Heap interface, see below |
Source
With this aspect of the integration, you can send all Chameleon events to Heap. This includes events such as:
- Tour Started
- Survey Completed
- Step Exited
To get the full list of Chameleon events, please see this Google Docs schema.
This will enable you to do things like:
- See the conversion on any product tour
- View which users responded positively to your microsurvey
- Evaluate how users that engage in a certain in-product campaign retain over the long term
Setup
To set up the Heap Chameleon source, all you need to do is visit the Heap Chameleon connection page in your Chameleon account and click Enable Heap.
You can also see a full list of instructions in Chameleon’s Heap integration user guide.
Data Format
Once enabled, Heap will automatically capture all Chameleon flow events such as Tour Started, Tour Completed, etc. To see the full list of Chameleon events, please see this Google Docs schema.
Destination
With this aspect of the integration, you can send the following Heap data to Chameleon to help with targeting Experiences inside your product:
- Heap events
- Heap webhooks
This will allow you to target Chameleon Experiences based on who users are (or are not) and what they have done (or not).
Events to Chameleon
To forwarded tracked events in Heap to Chameleon, create a Snapshot on any defined event in Heap, and use that Snapshot to trigger a “track event” action in Chameleon.
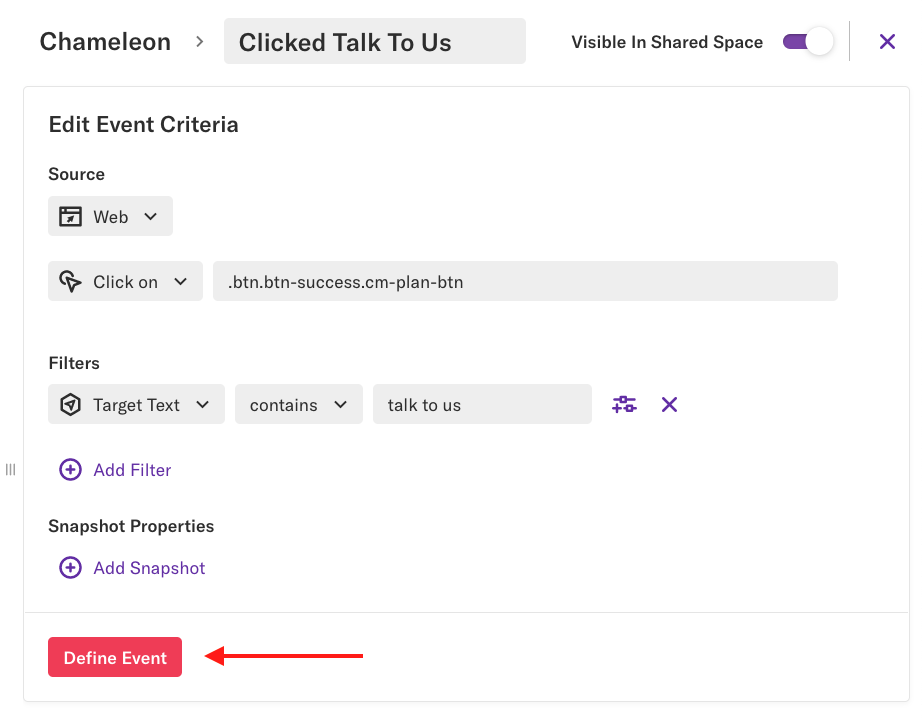
Step 1: Define an event in Heap and add a new snapshot property on the event from the events view.

Step 2: Set the property value to chmln.track(“event name”); where event name can be replaced with any event name you want to show up in Chameleon for this event.

Step 3: Test performing that event on your site and see if the event appears within Chameleon. You can view all your events within Chameleon in your dashboard.
Webhooks to Chameleon
With this aspect of the integration, you can send user event or profile data to Chameleon. For example:
- Append an attribute to a user profile in Chameleon to indicate their account size
- Add an event to a user profile in Chameleon when they completed a key action
You can then use this data to target Chameleon Experiences. You can configure your webhooks within the integrations section of your Heap dashboard by navigating to Integrations > Directory > Webhooks.
To add properties:
Step 1: Under Basic Configuration, add the following URL to trigger the POST request: https://observe.trychameleon.com/profiles.
Step 2: Add a Header called X-Account-Token. The token will be the same as the one contained within your unique Chameleon code snippet, which you can find in your Chameleon dashboard.
Step 3: In the Data to Send field, use uid as the first field (key). Choose the drop-down to be property and choose Identity from the drop-down field. Note: please make sure you are sending the same uid to both Heap and Chameleon as part of your installation identify calls.
Step 4: Add any other data fields to send to Chameleon.
Step 5: In Triggering Events, choose the Heap event that will trigger this webhook to run.
Step 6: Name and save your webhook. Fire the triggering event in your product and check to see the data was received in Chameleon. You can view all your user data within Chameleon in your dashboard here.
To send events:
This is similar to adding properties but with the main difference being the POST URL:
Step 1: In Basic Configuration, add the following URL to trigger the POST request: https://observe.trychameleon.com/events.
Step 2: Add a Header called X-Account-Token. The token will be the same as the one contained within your unique Chameleon code snippet, which you can find in your Chameleon dashboard.
Step 3: Under Data to Send, use uid as the first field (key). Choose the drop-down to be property and choose Identity from the drop-down field. Note: please make sure you are sending the same uid to both Heap and Chameleon as part of your installation identify calls.
Step 4: Add the name of the event. Under Data to Send, add an additional field titled name. Select the type as constant and add the text for the name of this event. You will use this to search and select this event in the Chameleon interface.
Step 5: Add the time of the event. Under Data to Send, add an additional field titled at. Select the type as constant and add $now as the value. You can also specify this differently as per your system of keeping time or the time you want to set the event to have occurred.
Step 6: in Triggering Events, choose the Heap event that will trigger this webhook to run.
Step 7: Name and save your webhook. Fire the triggering event in your product and check to see the data was received in Chameleon. You can view all your user events within Chameleon in your dashboard.
For any questions about this, contact us via the Get support page or contact the Chameleon team at help@trychameleon.com.
Segments to Chameleon
Please refer to Chameleon’s documentation for more information on sending Segment data out to Chameleon.